Do Files Get Uploaded to Dropbox Plus at the Origianal Size?
Dropbox is an astonishing software that helps you store, secure, and transfer files through all of your devices, but it tin can get overwhelming when dealing with its limits.
In this commodity, we're going to show you lot an in-depth review of file size limits that each Dropbox plan gives you.
And as well, a couple of tricks you can use to get around those limits and optimize your efficiency in working with Dropbox.
So no matter if yous're a registered Dropbox user or y'all're just considering if it's the correct file-sharing software for you, this postal service will help you run across how to overcome the limits of its sharing capacity.
Let'south swoop straight into the topic by looking at…
Dropbox'south File Size Limit on Every Plan
Dropbox, as with any other subscription-based software, has monthly limits on what yous can do.
Their cloud storage is beneficial for storing and sharing files, images, and videos with family, friends, and coworkers.
The big trouble comes when your files exceed ane of their limits.
When this happens, you will be forced to upgrade to a larger plan only to send a store or send a singular file.
That'southward why today, we want to talk a lilliputian more about how to get by Dropbox limitations, so you lot tin savour your work without having to worry about existence express by Dropbox.
And don't worry, most of Dropbox'south features are similar to all plans, even the free basic ane.
However, what'due south important here is the divergence in the storage space and sharing options.
Let's showtime with list the Dropbox storage space limits on every program so y'all tin get a better thought of what you lot're working with:
- Free Basic Plan = 2 GB (2000 MB)
- Dropbox Plus = two TB (2000 GB)
- Dropbox Family unit = 2 TB (2000 GB)
- Dropbox Business organisation Standard = 5 TB (3000 GB)
- Dropbox Business Avant-garde = No Limit
At present that we know that, people often face one other prominent restrictions when they endeavor to utilise Dropbox Transfer.
If you haven't heard of it, Dropbox Transfer is a feature that lets you share large files with other people.
It tin be extremely benign for people working on behemothic projects involving large videos or files daily.
In one case over again, information technology can exist frustrating to upgrade to the next programme just for using this feature once.
That'due south why nosotros're going to cover how to get past these limits through dissimilar methods further in the mail.
Just before we proceed, permit'southward first list all of Dropbox File Transfer limits then yous tin know exactly what you're working with:
- Free Bones Plan = 100 MB per Transfer
- Dropbox Plus = 2 GB per Transfer
- Dropbox Family = ii GB per Transfer
- Dropbox Business Standard = two GB per Transfer
- Dropbox Business Advanced = 100 GB per Transfer
Another cool thing about Dropbox Business organization Advanced is that it gives you the ability to delegate responsibility through your team members.
You tin limit the access to some of your shared links to specific members of your team or give greater access to others.
And that'south great considering this way y'all can manage your team more than efficiently and avoid any unexpected problems.
Simply the fun office comes in the next section of the post.
We're going to look at some of the tricks and non then well-known techniques yous tin employ to get by Dropbox's limits and optimize your workflow.
4 Tricks to Get Effectually Dropbox File Size Limits
Dropbox is an excellent Cloud for storing your valuable files and ensuring they stay safe and secure in the online space.
Nonetheless, it doesn't support its users when they desire to share data with other people who practice not utilize information technology.
As you've already seen in the department above, the limits that Dropbox gives you when you want to transfer files outside the deject is just up to 2GB for their standard plans and 100GB only for their Dropbox Business Advanced programme, which is not relevant for everybody.
That's why in this section of the postal service, we'll prove you some fantastic tips and tricks that will assist you reduce file size and transfer data easier.
#ane: Apply a Free Software to Transfer Files to Your Peers Before You Upload Them to Dropbox
The first trick nosotros're going to discuss will help you lot share large files with anyone even if they don't have a Dropbox account.
If you want to share files with other people who don't accept a Dropbox account, it's more convenient to use other gratuitous services similar TransferXL.
The adept part about this software is that it's completely gratuitous, and y'all don't accept to pay a dime for the Dropbox Plus, Family, or Business organisation Standard plans, which give you the option of transferring files only upwardly to 2GB.
Even ameliorate, with TransferXL Free Program, yous tin can transfer files and folders to your colleagues or squad members, which take upward to 5GB of infinite.
Y'all can transfer large videos, high-resolution pictures, and massive amounts of data using this method.
Just follow these simple steps to begin your transfer:
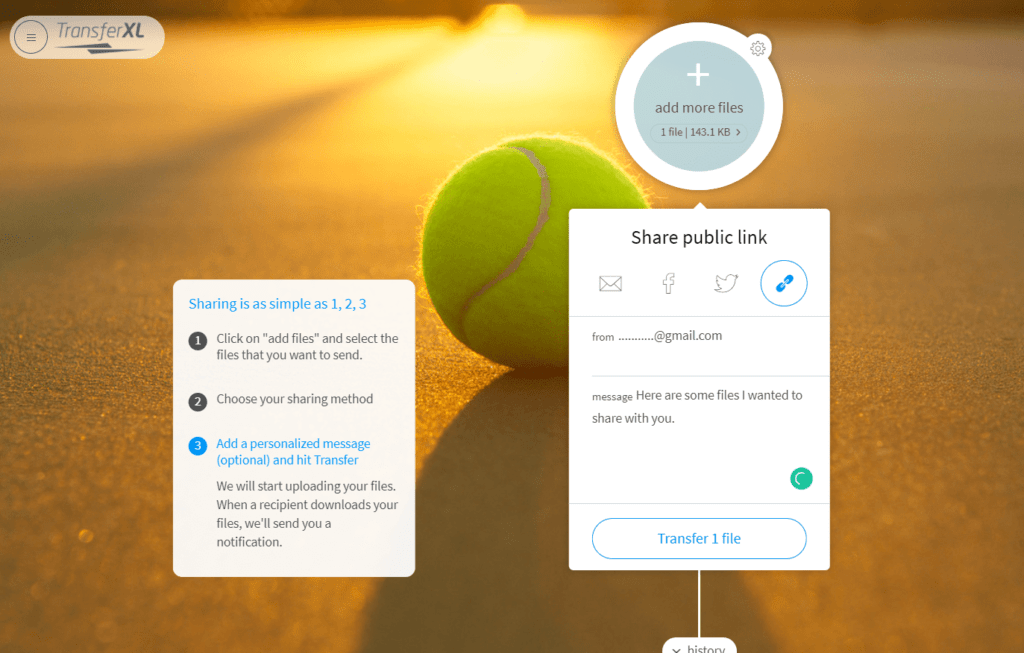
#ane Click the link to a higher place and go into TransferXL
#2 Click "Add files" or just drag & drop the files and folders you desire to share (even if you upload multiple files, the service takes care of zipping everything for you to brand your transfer easier)
#3 Choose your sharing method (you can mail information technology to contacts, apply Facebook and Twitter or create a public link that y'all tin copy)
#4 And finally, you lot can add together a personalized message and then hit Transfer.
That's how you can utilise TransferXL to transfer files beyond the file-sharing limits of Dropbox.
#2: Reduce The Size of The Files Y'all Want to Share
File pinch is one of the best solutions for sending huge files to your clients or co-workers.
If you're hit the maximum file size sharing limits on your current plan, you can e'er ZIP your files.
In this section, we'll share a brief overview of how you can do that.
How to Zero Files and Folders On Mac
If you're a mac user, just follow the simple steps outlined below:
#1 Gather multiple files you want to compress together in one binder. Ideally, you should create a new folder containing only the files you wish to compress.
#two Right-click or Ctrl-click the new folder and select "Shrink Items".
#3 The ZIP file will be saved in the same location y'all created the original folder.
Similarly, if you only want to compress specific files in a folder but not the entire folder, hold down the Command key and then click on whichever files you desire to zero.
When you select all of them, correct-click and select "Compress items".
All items volition be compressed into one single file, called "archive.zilch".
You lot tin always rename information technology later.
How to Create a Nix File on Windows 10 Using the "Transport to" Office
The process is similar and just as simple so permit'due south get correct to it:
#1 Ensure that all the files you're compressing are in one folder.
#2 Right-click on the folder or select all the files you need and and then right-click on one of them.
#three Find the "Send To" choice.
#four Click the "Compressed Folder" option, and you're done.
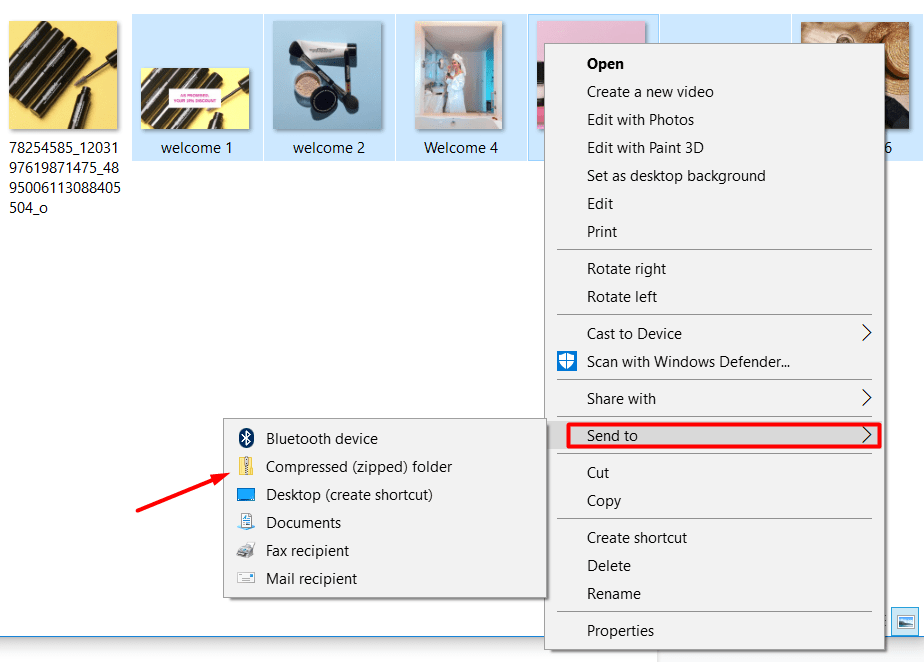
One time once again, the zipped file will be saved in the location you lot got the files from.
To uncompress the files you zipped on both Mac and Windows, merely right-click on the zipped binder and:
- On Mac – Hover over "Open up With", select "Archive Utility". The file volition unzip, and a new folder will be created with all of the files contained.
- On Windows – Select "Extract All". Then the files will exist extracted and stored in the aforementioned location every bit the ZIP file.
Now that nosotros've discussed how to compress the files you want to transfer, there's i last trick y'all demand to know.
#3: Reduce The Size of The Images Y'all Want to Share
Many people tend to employ deject-based services similar Dropbox to shop and share their memories in the form of images with friends and family.
And that's a great practise.
However, if you don't desire to keep your flick collection for yourself simply desire to share it with friends who don't have a Dropbox business relationship, and so things get tricky.
Furthermore, when using a professional person camera, picture sizes tin can go huge, like v-x MB / picture.
That's why in this part of the mail, we'll show you how yous can compress your images while ensuring that the quality doesn't get damaged.
We'll give you two convenient online services to help you lot with that:
The first one is TinyPng, which is more straightforward than the other one, and you can shrink .png and .jpg files.
However, TinyPng gives you a limit of 5mb per motion-picture show and 20 pictures max in a batch on their free version.
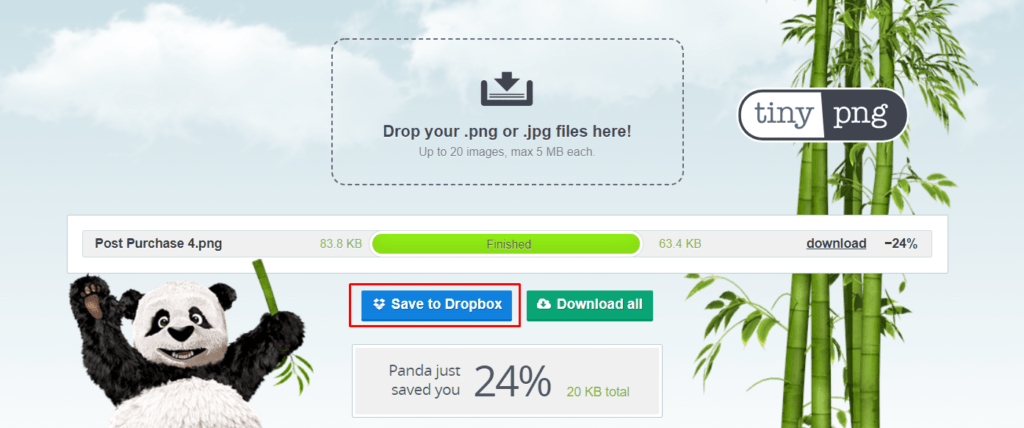
To apply it, just drag & drop your images on the TinyPng website and then click the "Save to Dropbox" button that appears.
The next software that gives y'all even more options and is called Img2Go.
In the image below, you can meet all the choices that the software gives you to compress pictures.
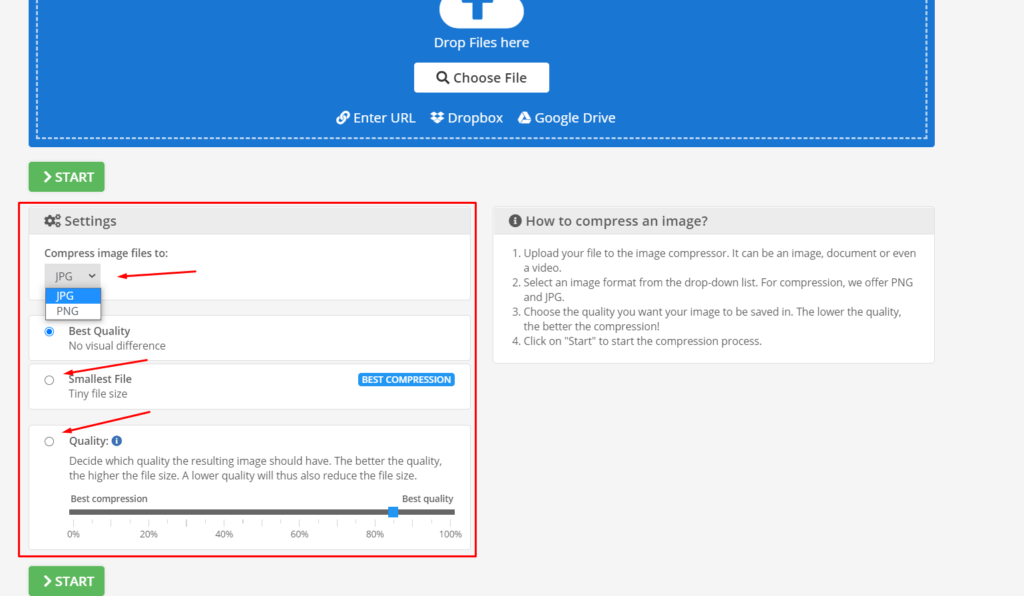
Here are the steps that yous have to follow to shrink your pictures:
#i Upload your file to the image compressor. You can likewise upload your images directly from your Dropbox Storage to brand the process easier.
#2 Select an image format from the drop-downwards list. For compression, they offer PNG and JPG. (shown in the picture in a higher place)
#3 Choose the quality which you lot want to salve your images in. The lower the quality, the better the compression! (You lot can choose different options for different occasions)
#4 Click on "Beginning" to kickoff the pinch process.
Once that's done, Img2Go will requite you the following options:

If you want to download the pictures direct to your computer, click the green "Download" button and relieve them to a convenient location.
On the other manus, if you want to use your Dropbox to store the pictures, click the "Cloud Upload" and then select "Dropbox".
The all-time office is that it'south also like shooting fish in a barrel to utilise and allows you to convert all kinds of images from different formats.
To exercise that, you can merely play with all the features information technology offers.
Now that yous know how to reduce the size of your pictures when you want to share them with friends, we'll also discuss how to:
#4: Reduce The Size of The Videos You Want to Share
For this purpose, nosotros'll be using some fantastic online software like Clipchamp and VideoSmaller to get past Dropbox file-sharing limits and make your workflow easier.
You can utilize VideoSmaller for minor videos up to 500 MB, and the best part is that it'southward completely free.
Simply click the link, upload your video file, tweak a couple of options, and you lot're good to go.
The 2nd application is Clipchamp.
Information technology is perfect if you want to have more options, including the ability to edit your videos, compress videos of any size, and process them in batches.
Information technology'due south the better option if you're going to compress videos consistently and desire a professional person editor.
The only difference comes with Clipchamp's free trial.
It watermarks your videos, and if you want to remove the watermark, y'all'll demand to either pay the $vii.50 / month yearly subscription or $9.00 for one calendar month.
So if you lot desire to make the process as easy as possible without downloading software to your computer, Clipchamp is the style to become.
And this last fob sums upwardly the whole post for today.
To conclude the article, I suggest you pick the Dropbox program that best fits your needs and start storing and sharing the files you need.
There are many cool tricks and techniques to get around Dropbox's limits, and today we shared with you the ones that have worked great for united states and volition work even better for you.
Source: https://nira.com/dropbox-file-size-limit/
Post a Comment for "Do Files Get Uploaded to Dropbox Plus at the Origianal Size?"